Withdrawing ETH from the Keystone hardware wallet is a safe and easy process when you follow the correct steps. Whether you’re sending Ethereum to an exchange, another wallet, or a friend, Keystone offers a secure, air-gapped method to complete your transaction. In this guide, we’ll walk you through how to withdraw ETH from Keystone hardware wallet using clear and simple steps.
Keystone wallets keep your private keys offline and safe from online threats. By using QR-code-based signing and secure verification, Keystone ensures that your funds remain in your control. Let’s dive into the process of sending ETH from your wallet.
What You Need Before You Start
Before you begin the process to withdraw ETH from the Keystone hardware wallet, make sure the following items are ready:
- Your Keystone hardware wallet (fully charged)
- A compatible software wallet (such as Keystone Mobile App, MetaMask, or others)
- Internet access for the software wallet (Keystone remains offline)
- The recipient’s ETH address
- Sufficient ETH balance (including gas fees)
How to Withdraw ETH from Keystone Hardware Wallet?
Here is a simple guide to help you withdraw crypto from your Keystone hardware wallet:
1. Open Your Keystone Wallet and Select Ethereum
Start by turning on your Keystone device. From the list of supported cryptocurrencies, tap on Ethereum (ETH). This action will display your Ethereum account details on the device.
2. Connect Keystone to a Software Wallet (View-Only Mode)
To prepare and broadcast a transaction, you must link your Keystone to a software wallet.
- Open your preferred app like Keystone Mobile App or MetaMask.
- Select “Connect Hardware Wallet” and scan the QR code shown on the Keystone screen.
- This will import your Ethereum account as a watch-only wallet, allowing you to view balances and create unsigned transactions.
📌 Note: This step does not expose your private keys.
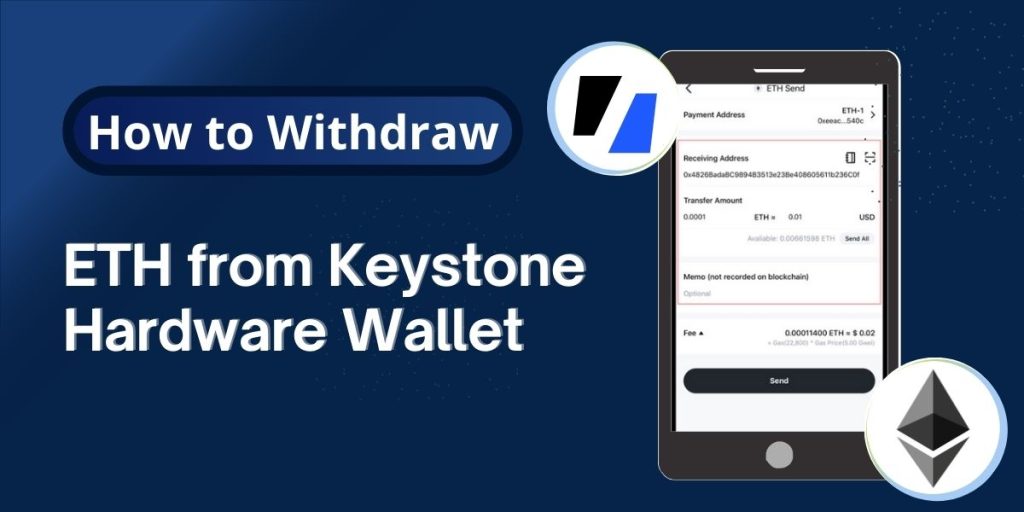
3. Start a New ETH Withdrawal Transaction
In your software wallet:
- Tap on “Send”
- Choose Ethereum (ETH)
- Enter the recipient’s ETH address
- Specify the amount you want to withdraw
- Adjust the gas fee, or leave it on auto if you’re unsure
Review all the details carefully before moving on.
4. Generate and Scan the Unsigned Transaction
After filling out the transaction:
- Your software wallet will show a QR code with the unsigned transaction
- Use your Keystone device to scan this QR code
Your Keystone wallet will now display all the transaction details for you to review.
5. Sign the Transaction Securely with Keystone
Once you confirm the transaction details on the Keystone screen:
- Press “Sign” to sign the transaction offline
- The Keystone will generate a QR code with the signed data
This step ensures your ETH withdrawal is signed securely without connecting to the internet.
6. Broadcast the Transaction via the Software Wallet
- Go back to the software wallet
- Use the wallet’s built-in scanner to scan the signed QR code from your Keystone device
- The wallet will now broadcast the signed transaction to the Ethereum blockchain
You’ve now completed your ETH withdrawal from your Keystone hardware wallet.
Read also: How to send crypto from Keystone to MetaMask wallet?
After You Withdraw ETH
- Once submitted, the transaction will appear on the Ethereum network.
- You can use Etherscan.io to check the transaction status using its hash (TxID).
- When the transaction is confirmed, your ETH will arrive at the destination wallet.
Tips for a Smooth Withdrawal
- Always verify the recipient address on both the app and your hardware wallet.
- Be aware of Ethereum network fees, which may vary depending on network congestion.
- Keep your hardware wallet’s firmware updated for the latest security features.
- Never share your private keys or recovery phrase with anyone.
Troubleshooting: Fix Common ETH Withdrawal Issues
Even with a smooth system like Keystone, you might face occasional hiccups. Here’s how to quickly fix the most common problems when trying to withdraw ETH from your Keystone hardware wallet:
- QR Code won’t scan: Make sure the lighting is good and the QR code is clear. Adjust the distance between your Keystone and the screen.
- Transaction Stuck: Check your internet connection. If the signed QR code didn’t scan right, try again, capturing the whole code.
- Not Enough ETH: Look at your balance in MetaMask. You need enough ETH for both the transfer and gas fees.
- Wrong Address: Always double-check the recipient’s address before confirming. A mistake could mean losing your ETH.
These tips should help you resolve issues and keep the process smooth. If you’re still feeling confused or unsure at any step, feel free to contact us we’re here to help you.
Conclusion
Now you know exactly how to withdraw ETH from the Keystone hardware wallet with confidence. The process is secure, efficient, and gives you full control of your Ethereum funds. Keystone’s air-gapped design and QR-based transaction signing make it an ideal wallet for safe withdrawals in the crypto space.
Frequently Asked Questions (FAQs)
Can I use the same ETH address for ERC-20 tokens?
Yes, your ETH address is also valid for receiving and managing ERC-20 tokens
What happens if I lose my Keystone device?
Don’t worry! If you have your seed phrase, you can recover your wallet on a new device. Keep that phrase safe!